ComfyUI setup and introduction to SDXL models
notalice
2025-12-14
ComfyUI is one of the most popular and powerful Stable Diffusion tools out there. And we will get it up and running in around 15 minutes.
In this guide we will setup ComfyUI locally on your machine. This is part of a free ebook about Stable Diffusion, which you can keep reading further if you want.
Can you run ComfyUI?
That's the first thing we need to know before proceeding.
Here we have some comfortable requirements:
- 12GB VRAM
- 32GB RAM, or 64GB ram for multi-tasking on your PC while generating stuff
If you do not have these requirements, do not worry, I will also show you how to setup it through a cloud service.
Setup ComfyUI locally
If you have the requirements set above, then lets proceed, otherwise skip this section, and scroll down below, to learn how to run it on the cloud.
- Go to https://www.comfy.org/download
- Click on the download button for your platform. Windows or MAC are available for ComfyUI desktop
If you are on Linux, let's do a manual install:
- Install some of the required packages with
sudo apt install git python3 - CD to the folder where you want to install ComfyUI
- Type
git clone https://github.com/comfyanonymous/ComfyUI.git - CD to the cloned folder
- Type
python3 -m venv .venvto create a new virtual environment for our ComfyUI server - Activate your env, for example with
source .venv/bin/activate. The correct command will show on the terminal after you create the python virtual environment. - Install PyTorch (run one of the commands below, depending on your GPU model):
- NVIDIA:
pip install torch torchvision torchaudio --extra-index-url https://download.pytorch.org/whl/cu130 - AMD:
pip install torch torchvision torchaudio --index-url https://download.pytorch.org/whl/rocm6.4 - Intel:
pip install torch torchvision torchaudio --index-url https://download.pytorch.org/whl/xpu
- Install the requirements to run ComfyUI:
pip install -r requirements.txt
For the Linux manual installation, after you install all the requirements, you can make a script to easily open ComfyUI:
- Type
nano ./start.sh - Paste the code below
#!/bin/bash
source .venv/bin/activate
python3 ./main.py
- Press CTRL+O and CTRL+X so we save and close nano.
- Type
chmod +x ./start.sh - You can now run
./start.shto open ComfyUI
For further information you can check the ComfyUI repository.
Setup ComfyUI in the cloud
Skip this if you have installed ComfyUI locally.
For a cloud example, I will show you how to run it on RunPod.
- Sign-up to RunPod at https://console.runpod.io/deploy (this is not an affiliated link)
- Go to deploy page by clicking on Pods in the left sidebar, or just click the link above again after logging in.
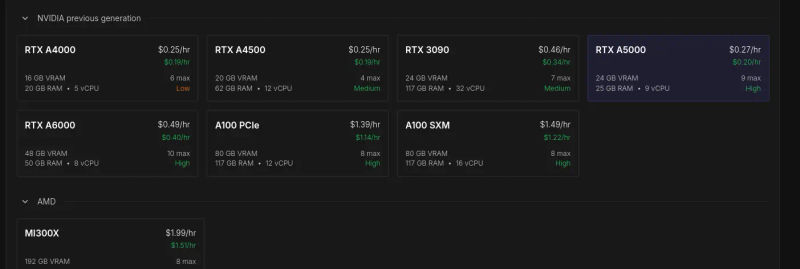
- You will be greeted with a list of GPUs, for the purposes of this ebook, search for one that costs less than $0.50/hour, you can also go to NVIDIA previous generation, and grab one that costs less than $0.30/hour. Anything with more than 16GB VRAM is fine here.
- Click on the one you want
- Scroll down to "Pod template"
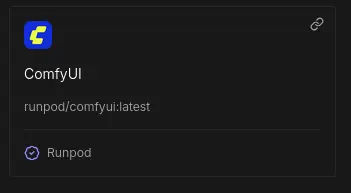
- Click on "Change Template"
- Search for "runpod/comfyui"
- Select the first option
- The other options leave the default: GPU count is 1, Instance Pricing is on-demand
- Click on deploy on demand
- After you charge your account and deploy, you'll have to wait a bit on the connection screen
- On the pods page click on your pod
- On the panel that opens, look for "Port 8188"
- Click on the ComfyUI link, it may take some time to be ready, wait a bit and refresh the page
- Close the template page that appears on ComfyUI
Now you have ComfyUI available in the cloud!
Install the ComfyUI manager
If you use the portable version or if you don't see a Manager option on the top right of the comfyui, you need to follow the next steps.
If you are on the non-portable version or on the cloud version:
- If you are on the cloud, you need to connect to it through SSH to do the commands below
- CD to the
ComfyUI/custom_nodesfolder - Type
git clone https://github.com/ltdrdata/ComfyUI-Manager comfyui-manager - Restart ComfyUI
If you have the portable ComfyUI:
- Install Git standalone-version: https://git-scm.com
installwindows - Open this page https://raw.githubusercontent.com/Comfy-Org/ComfyUI-Manager
mainscripts/install-manager-for-portable-version.bat - Right-click the page, and select "Save as..."
- Save it on the portable folder
ComfyUI_windows_portable - Double-click the downloaded .bat file
install-manager-for-portable-version.bat
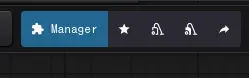
If you did it correctly, after restarting ComfyUI, and refreshing the browser page, it should now have the Manager button on the top right.
How to use ComfyUI
Now I'll give you a brief introduction to ComfyUI and the ComfyUI manager.
On the top right of the screen you have the Manager button and 4 buttons to the right of it.
Hover the buttons and wait a second for each, ComfyUI will show a help text on each one of them.
The important ones there are: Manager, Unload Models, Free model and node cache.
On the Manager, we can install custom nodes, update comfy ui, update nodes, restart comfy ui, you can open it and explore around.
Unload Models will free up your VRAM, same with the free model and node cache, I use it after switching checkpoints or changing the workflow a lot, to ensure a clean run.
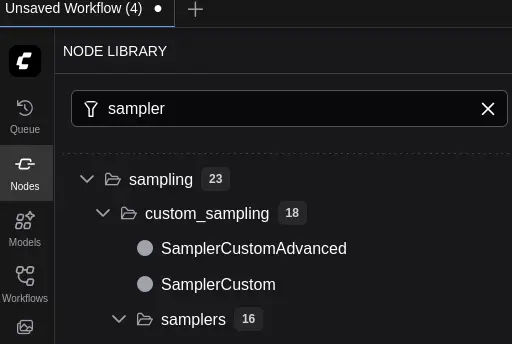
On the left sidebar of ComfyUI, we have:
- nodes: a list of all nodes/custom nodes we installed.
- workflows: all our workflows, workflows are different setups we have, we can arrange nodes differently, to do a specific thing, for example you can have a generation workflow, a remove background workflow, etc, they help you to organize yourself
- other options: not really needed to learn right now, you can click around all other options, but for now, focus on nodes and workflows
And somewhere on your screen, for me on the top right, there is a Run button, which will run your workflow.
Models / checkpoints
To generate an image, you need a checkpoint.
But what is that?
In games, a checkpoint is a place where the game is saved, and you can continue playing from that checkpoint.
Our checkpoints in stable diffusion, are a point in the model learning, where we can use to generate our images. We could also train it further from that specific checkpoint, into another checkpoint, and so on.
For example, we have SDXL, and then we have Illustrious, Illustrious is a checkpoint on top of SDXL, and we could also have a checkpoint on top of Illustrious.
Like in games, where you can play, save the game, then continue later and do something different, we can train models, then train them further, etc.
ComfyUI gives you a bunch of nodes, which are basically a bunch of code that you can connect together, and one of these is called Load Checkpoint.
This is the starting point for a basic generation, we need to load a checkpoint, so we can use the checkpoint.
Downloading a checkpoint
For this ebook, let's use some SDXL checkpoint, like Illustrious.
Go to https://civitai.commodels795765/illustrious-xl and click on the download button on the right, you might have to log-in.
CivitAI is a website with public available models.
- Download it into the folder
ComfyUI/models/checkpoints - After it finishes downloading, press R on the ComfyUI page
- Now you can use it on the Load Checkpoint node
We'll build our first workflow in the next chapter, so do not worry about the Load Checkpoint node right now.
Illustrious as the name suggests is a checkpoint focused on illustrations. You can try any other checkpoint you want, I only would suggest that it is an SDXL checkpoint for the purposes of this ebook.
Let's get familiar with the ComfyUI folder structure:
ComfyUI/
├── models/
│   ├── checkpoints/
│   │   ├── illustrious-xl.safetensors
│   │   ├── pony-diffusion.safetensors
│   │   └── sdxl-1.0.safetensors
│   ├── loras/
│   ├── controlnet/
│   ├── vae/
│   └── upscale_models/
├── custom_nodes/
├── web/
├── main.py
└── requirements.txt
You might not know what loras, controlnet, vae, and upscale_models are for now, and thats fine.
By adding a checkpoint in the checkpoints folder, ComfyUI will be able to use it to generate images.
The other folders as you may imagine, work in a similar fashion, and when you learn what they are, you simply will place the models on the respective folders.
SD 1.5, FLUX, SDXL, what is all that?
When you start looking at models, you will read these names.
These are different models.
SD 1.5 - the most lightweight of the three, with 6-8GB VRAM you can run it, it's considered older now, but it has a large quantity of content created by the community.
SDXL is a sweet middle-ground, 10-12GB VRAM, better overall quality than SD 1.5, this is the focus of our ebook.
Flux is the most resource intensive, it requires 16GB+ VRAM, due to the entry barrier, you can expect less community resources than SDXL. It has the best quality currently possible.
Our guide will focus on SDXL, the middleground, but you can still use things you learn here with other models.
But one doubt might pop on your mind, we just downloaded something called Illustrious, it's not named here.
Illustrious is on top of SDXL, any time you hear a checkpoint name, you can Google/research what is its base, and a lot of times it will be one of these three.
Good progress
Installing ComfyUI is an excellent start to your stable diffusion learning process.
This is a chapter part of a free website ebook: Stable Diffusion for Dummies: Free Ebook
Next steps coming soon.