Fix Bad Hands, Eyes & Feet in SDXL (ComfyUI Workflow Guide)
notalice
2025-12-18
It's time to focus on details that matter a lot on a generation. You want to generate hands with 5 fingers, feet with 5 toes, decent eyes? Say no more!
It doesn't take much time to get the anatomy correct on SDXL, it's just a matter of understanding the workflow.
Why stable diffusion sometimes generate bugged hands?
If you are getting bugged hands, feet, or eyes, do not worry, you might not even be doing anything wrong.
Hands, feet, and eyes have complex anatomy, think of how many perspectives and variations you can have just with the hand alone?
To improve the quality of these parts of the body, we need to give the AI more pixels to work with on that region.
And that's exactly what you'll learn on this guide.
Busting myths about hands in SDXL
If you want, you can specify hand on the positive prompt
You can prompt nails, nail polish, hand positions like closed fist etc
Keep your negative prompt clean
You do not need to specify 500 different hand-related negative prompts
You don't need diffused hands, 6 fingers, 4 fingers, missing fingers, and so on, in your negative prompt
Creating the ComfyUI workflow for good hands, feet, and eyes
First of all, let's start with a base workflow, if you are a veteran you can skip this setup part.
The base workflow image is available below all of the steps.
Setting up the workflow from scratch
What you're building
You'll be creating a ComfyUI workflow with ComfyUI native nodes, this basic setup will have positive and negative prompts, and a KSampler, along required SDXL nodes.
Adding basic nodes
- Create a new ComfyUI workflow
- Add the following nodes:
Load Checkpoint,CLIP Set Last Layer, 2xClipTextEncodeSDXL,Empty Latent Image,KSampler,VAE Decode,Save Image - Now, let's add some constants: Open the Node Library by pressing N and search for
Primitive - Add 2x
String (Multiline) - Double click the strings on their title, rename to Positive, and one to Negative

Connecting the basic nodes
- The positive should be connected in both
text_gandtext_lof the sameClipTextEncodeSDXL - Do the same with the negative, connect it to both
text_gandtext_lof the otherClipTextEncodeSDXL - Now on the nodes tab, you have "primitive" on the search bar, from there grab the
Intnode, add two of them - Rename one to Width, and the other to Height, set both to
1024andcontrol after generateset that to fixed. - Connect
WidthtoEmpty Latent Imagewidth and height inputs, also setwidthandtarget_widthof bothClipTextEncodeSDXLto be this width. - Do the same with
Height, but now on the height inputs
Wrapping everything together
- Connect
ClipfromLoad CheckpointintoCLIP Set Last Layerclip. - Connect
ClipfromCLIP Set Last Layerto bothClipTextEncodeSDXLclips. - Important: Set
CLIP Set Last Layervalue to-2for SDXL models. - Connect
LatentfromEmpty Latent ImageintoKSamplerlatent. - Connect the
Positive ClipTextEncodeSDXLinto thepositiveinput ofKSampler Negative ClipTextEncodeSDXLintonegativeinput of theKSampler- Connect
modelfromLoad CheckpointintoKSamplermodel input
Before we continue, check if your workflow is correct so far:
KSampler inputs are all connected now: model, positive, negative, latent image
Empty Latent Image has your width and height from the Width and Height primitive nodes
Both ClipTextEncodeSDXL have width, height, target_width, target_height, text_g and text_l inputs filled!
CLIP Set Last Layer is between Load Checkpoint and the two ClipTextEncodeSDXL
Width and Height are FIXED, and have 1024 as value
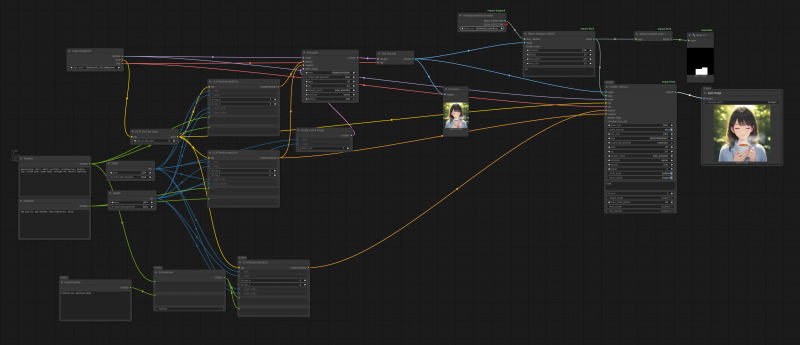
There are more connections to make, for this, I will send an image of the workflow so far, so you can complete it more visually. Reading public ComfyUI workflows and being able to reproduce them is a good skill to have.

After your workflow matches the image above, lets proceed, next we will generate the basic image for testing.
Generating an image with hand focus
If you are using the Illustrious model, you can test your workflow with my settings:
Positive: masterpiece, 1girl, adult, portrait, drinking tea, holding cup, closed eyes, upper body, straight-on, natural lighting
Negative: bad quality, bad anatomy, bad proportions, young
Cfg: (Set this at the KSampler node) 5.5
Sampler Name: Euler Ancestral
Scheduler: Karras
Steps: 30
Set all of that, and click on RUN! 🚀

These results are okay. But pay attention to the hands, they are blurry. The finger count seems fine.
But this could be better if we gave the AI a better resolution to work with. So let's add detailing to our workflow.
Now that we have a working workflow that generates an image, we will be adding the hand detailer to the workflow.
Adding a hand detailer to our SDXL ComfyUI workflow.
Requirements
- Install the Impact Pack and Impact Subpack from ComfyUI Manager > Custom Nodes Manager
- hand_yolov9c.pt: Click on the download button on this page, and extract into
ComfyUI/models/ultralytics/bbox/hand_yolov9c.pt
If you didn't have the model and the addon before, restart ComfyUI
Explanation of the detailing nodes
- Detailer (SEGS): This is like the KSampler but for adding details to your image
- BBOX Detector (SEGS): This is used to create a mask, for this use-case we will make a mask of the hands of our character
- UltralyticsDetectorProvider: This is the detector model, which is able to look for the hands in the image, you need to select that model in this node
- hand_yolov9c.pt: this is a model, which you select at UltralyticsDetectorProvider
Add the nodes we will use for detailing
- Press N to open the node panel
- Search for Detailer (SEGS) and add it
- Add BBOX Detector (Segs)
- Add UltralyticsDetectorProvider
Connecting the detailer nodes
Basic Connections
- UltralyticsDetectorProvider BBOX_DETECTOR bbox_detector from BBOX Detector (SEGS)
- BBOX Detector (SEGS) SEGS segs from Detailer (SEGS)
- VAE Decode image image from Detailer (SEGS)
- For VAE and Model grab them from the Load Checkpoint
- Clip is the clip from AFTER the set last layer node
Finishing Touches
After the basic connections above, let's finish up the workflow:
- Copy and paste the POSITIVE multiline string, and its ClipTextEncodeSDXL node, these new ones will be the hand detailer positive.
- For the negative, you can use the same as the source image.
- Move the Save Image to be after the detailer, and put a Preview Image in its place after generating the first image.
Configure the detailer
- For the positive prompt, you can append a new prompt to the original image's positive prompt, OR use a brand new prompt
- For Cfg, Scheduler, Sampler Name, you can copy the original KSampler settings
- For denoise leave at 0.5
- On wildcard spec, type hand
- (For low vram users) Enable tiled_encode and tiled_decode. This reduces VRAM but also decreases speed.
- 20 steps is fine for now!
- Increase guide size to 1024
The screenshot above can be used to load the workflow. It has the Concatenate node, to add the original input into the hand detailer prompt.
Detailing time!
Click on Run. If any node shows red, just connecting them as needed.

Next, we will add a person/body detailer and eyes detailer.
Adding more detailers
You can add any sort of detailer you want, this will become easier as you learn more about stable diffusion masking.
Adding two more detailers
- Click on Detailer (SEGS) to select it
- Hold CTRL on your keyboard, and also click on UltralyticsDetectorProvider and BBOX Detector (SEGS)
- Paste these nodes twice (2x CTRL + V)
Adding two extra positive prompts
The new detailers need a positive prompt of their own
- Click on ClipTextEncodeSDXL, the one going into the first detailer
- Hold CTRL and click on Concatanate and the Positive string node
- Paste twice
Connecting everything together
Now just connect the nodes, similar to the first detailer.
The only thing to look out for is that the input image of the next detailer, is the output image of the previous detailer.
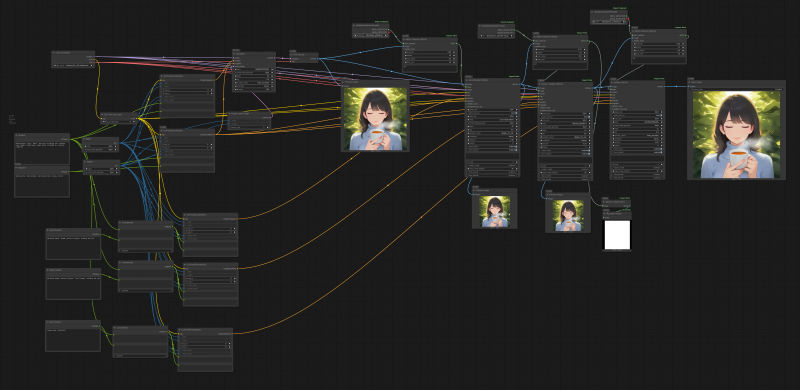
Below is a screenshot of the whole workflow, you can also use it to import and use the workflow.
The detectors I am using:
- person_yolov8m-seg.pt: This will detect people, for general anatomy, like feet, head, arms, legs, etc
- eyeful v2: Good for illustrated eyes
Both go into the BBOX folder
The good part about this workflow, is that you can easily switch the detailers if you need something else specific
In depth: How to configure detailers
If you just copy all the settings above, without understanding them, it may work for some generations, but when you need to adjust these values, you won't know what to do.
Let's take just a few minutes to understand what is happening!
- Why are we concatenating prompts?
Our detailers are basically sampling, but with a lower denoise, to make the generation being sampled by the detailer, similar to the original one, we append the original prompt.
Let's say we generate masterpiece, 1boy, side view, flying, clouds, muscular
When we detail that, if we do not concatenate, it will have only the detailer prompts, for example: hands
That's much less context than the original generation had...
When we concatenate, we get this: masterpiece, 1boy, side view, flying, clouds, muscular, hands
We are basically using the prompt of the original generation as a context, and adding tags related to the focus of that specific detailer
- What really is the Detailer (SEGS)?
When we generate an image with the KSampler, we use denoising 1, this means that the model will change 100% of the latent image.
The Detailer (SEGS) nodes unlocks a powerful combination:
We can specify "segs", segments of the image in which we will denoise/paint, and with a specific amount of denoise, for example only change 40% of the image.
- What are SEGS?
SEGS are segments, they denote a specific area of the image.
For regular users like us, we can pretend that they are the same as masks.
Think of a picture that is black and white, white values means that we are selecting this pixel, and black means we will ignore it.
And besides that, gray will have partial influence. We can have for example: a blurred grayscale image, meaning we will softly denoise certain areas.
The mask is a copy of the image you are masking, but in black and white (and gray), representing a specific selected area.
For our use case, we use it as a segment, so we can tell the detailer: here is the hand of my character, only change that.
But this gives us another question: how can we select just the hands of our character automatically? This is where the BBOX Detector stuff comes in. I will explain it below.
- Why we use the UltralyticsDetectorProvider and BBOX Detector?
First, UltralyticsDetectorProvider is a helpful node from the Impact Subpack, it helps us to load our segmentation model.
For example: person_yolov8m-seg.pt is a segmentation model.
These models are used training by labeling a lot of data, for example there's a photograph of a person, and someone goes and puts a box around the hands that are present in this picture, and label it "hand". After that is done many times, the model begins to understand what is a hand.
When we run BBOX Detector, we pass our image, and the provider/model.
We are basically telling ComfyUI: "Here is my image, and my detection model, give me masks/segments selecting what this detection model detected".
So if you used a model specialized in hands, it will give you a mask with your character hands!
We then pass that to our Detailer (SEGS) and it will generate only the hands of our character.
- BBOX or SEGS?
Segs goes around the perfect detection, BBOX is a box around it.
In other words: segs is more detailed, its like a perfect silhouette, and bbox is if we wrap that silhouette in a box, it has extra room.
They are just different techniques for you to use.
- How to improve detailing quality?
Besides making sure that you have good Cfg and sampler settings, there are detailer specific settings.
guide_size can improve the quality of your detailed image, you can keep it at 768 or 1024 for a decent speed/quality.
Further learning
Detailing is about balancing settings, and masking well.
In the next chapters we will learn more about masking.
Learn more in the free educational guide for SDXL: Stable Diffusion for Dummies: Free Ebook.