
How to Fix Plastic Skin in Stable Diffusion
notalice
2025-12-14
Bland images, plastic-looking skin, flat image, does any of that ring a bell? This is a common problem when generating images with stable diffusion.
We'll learn what is happening, and how we can fix it.
Why AI images have fake plastic skin?
To better understand what is happening with your images, let's think for a second. Where in the real-world we see images with fake and plastic-looking skin?
Well... everywhere!
Images with unrealistic skin are everywhere on the internet, and they are often associated with "beauty, perfection, clear skin".
The dataset your checkpoint is using, is probably filled with this kind of image, which is why you should learn how to avoid this.
Adding imperfections to avoid wax people
Now, the fix for your fake-looking AI characters: true realism.
Look at the real world, at real people, pay close attention. You'll notice "imperfections" everywhere.
There is an infinite amount of detail in reality, no line is ever straight, there's rust, mold, irregularities.
Now paying attention to people's skin: subtle color changes everywhere, blemishes even if small, scars, moles, freckles, unique vein patterns.
You'll start to notice that in computer-generated images, perfection is created through what others would consider imperfections.
Best prompts to add imperfections
Now, practical part of this guide.
The first thing you should do is analyze your current prompt, negative and positive. Follow the steps below.
- Look for excessive quality tags like:
masterpiece,high_res,best_quality,absurd_res, etc. - Do you have too many quality tags? Try removing one or two, and generating your image again.
- Now glance over your negative prompt. Is there an excessive use of negative quality tags? For example
worst_quality,low_res,medium_quality,ugly - If you have too many of these, study what is the effect of removing some of them.
Good, accessing your prompt, removing and generating again, is the first step to fix plastic skin.
The previous instructions were more of a sanity-check, now lets go over some steps to make the skin more realistic.
Add one of the following prompts to your positive prompt:
(Keep in mind that some may alter how your character look, only pick what is applicable for your character)
skin poressubtle skin blemishesmolescarstansunburnveinsbody blushnatural skinmuscularunderweightfat- /(fat:0.5)/
After adding a single one, generate your image again, observe what has changed. Try to answer the following question: "what the AI understood from the word I just added?". This will help you figure out which direction you should push.
Now for negative prompts:
photoshopmagazinemakeupperfect skinsmooth skinmoisturizerfoundationactresssymmetric
As a warning, some of these prompts can negatively impact your generation, if what you are trying to generate gets misunderstood. For example: "actress" can help to avoid overly processed results, but if you are trying to generate some actress, then you should find a replacement for this prompt.
smooth skin is a powerful negative prompt in many checkpoints, it can be hit or miss, but worth keeping in your cheatsheet. My theory is that it strongly avoids crazy fashion magazine images, and images from beauty products websites and such.A study on imperfections
Perfection is achieved, not when there is nothing more to add, but when there is nothing left to take away.
― Antoine de Saint-Exupéry, Airman's Odyssey
To really understand the topic, it's time to generate some images!
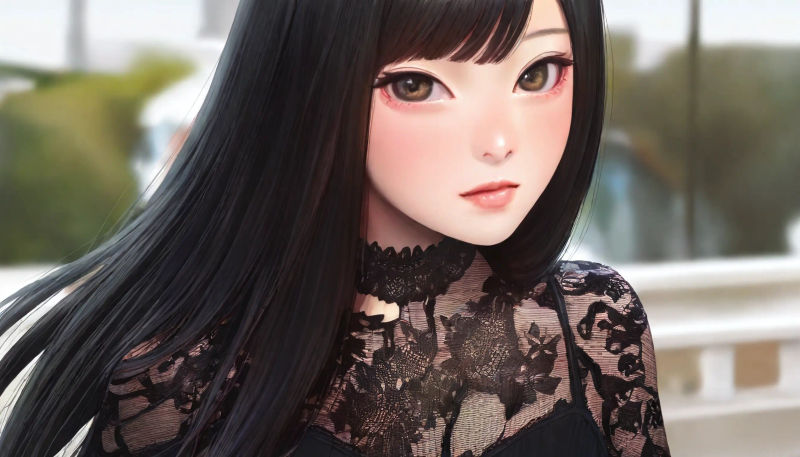
Let's observe this picture.
It seems like either the model, or one of the prompts, has a bias towards makeup. So I will be adding makeup as a negative prompt.
After generating again, I observed that nothing changed much, so I tried more tags, smooth skin, foundation, blush, lipstick, these negative prompts were added through some generations and testing.
On the positive prompts, I added subtle skin blemishes, this one had a big impact in the overall picture. And also mole.
This is our next generation:

Some interesting things happened here.
Her eyelid is now more visible and pronounced, and the eye structure is more pronounced, seems like the AI has put more attention to the eyebrows as well.
The pose and composition is nearly identical, this is a good sign, the prompts we added should not change composition, if they did, we would have to find another prompt to use.
The lips are less oversaturated, and interestingly, the background seems slightly more well defined.
Now we have a good base on this picture, but there is one problem, what do we want from this picture? Is it realism? semi-realism? an illustration?
Let's define that our goal is semi-realism. Now going through some generations, I notice that there is a strong bokeh effect, which is making the skin overly bright.
Because our goal is semi-realism, we can negative prompt bokeh without much worry. I can also now negative 3d render, although some 3d renders can look nice, many of them are perfect computer-generated images, with sharp argles, perfect planes, flat rendering, which we do not want.

Now with a set direction (semi-realism), we can apply more specific tags. You may notice that the skin detail, in our new style, is only noticed by how the colors are applied on correct spots.
Because of the style we have chosen, let's remove sketch from the negative prompt, and also add a style-specific prompt to the positives, expressionism.
symmetric also looks like a good addition for our specific image, negativating it will make the picture more interesting.
solo will be added, after the lack of details have been noticed, not on the skin but on the illustration in general, this will make the AI pay more attention to our character.

Here's an explanation behind the changes:
- /semi-realistic/,
painterly,expressionism: we are painting a clear picture of the style we want animeandcartoonon the negative prompt: the AI has some idea that we want something 2d, but it may draw anime characters which are very popular in datasets like illustrious, so we negative these to get what we want.black eyeshadow,eyeliner,thick eyebrows,detailed hair: Added more focus on the character's features, we are telling the AI: "pay attention to these areas"
Because this is a semi-realistic image, it can be a bit difficult to observe the skin. But let's pay attention to certain details.
Around and under the eyes, we can see good rendering of the skin, this is a very tricky area to get right.
The nose doesn't look perfect, and that's fine, it's not overly shiny or dying with contrast, it has a little spark, and two assymetric lines, and that's it, with a soft gradient for shading.
Another piece that is also affected by out symmetric negative prompt is the mouth, you can see the top lip has an odd shape, I am fine with that, if these bother you, avoid the negative symmetry prompt, and instead try something like side view or other perspectives.
Overall, decent results for a base generation, this has a basic hires fix on it, but there is no detailer + upscale, which could fix some mistakes on this generation.
Conclusion
I hope that by providing the prompt iterations through a generation has given you a better understanding of how to handling skin issues in stable diffusion.
As a short recap, in order to create good images, we have to fight with a big desire for perfection which is present on many stable diffusion models.
It's important to try to understand what your model is doing when you add or remove a single prompt.